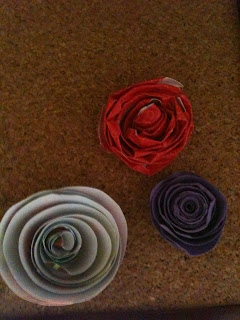
This was a fun idea that a friend shared with me. Flower Tacks!!!! I should have taken step by step pictures, but I didn't think about it until now. However, it is easy, peasy!! My kind of craft. Looks very chic, but anyone can do it!
Take a piece of scrapbook paper approximately 4 inches square then draw a spiral starting in the middle going out. Do this on the plain side of the paper - this will be the inside of the flower. Here is an example....
You will need to cut this out on the line so you end up with a springy piece of paper. Play with the diameter and height to get different looks!
Next step is to roll. Starting with the outside end start rolling tightly. Be careful to try to keep each roll tight and straight along the bottom. (there is a tool you can use to assist with this that makes a world of difference! if you plan on making more than one of these, i would highly recommend it!) when you get to the end you will be left with a little 'flap' that fits nicely against the bottom of the flower. Carefully stick a tack through that flap with the decorative side on the outside and glue the flap to the rest of the flower. Be generous with the Elmer's to be sure it sticks the flower together too so that it won't unravel. Once you've got your flower all nice let it dry then I like to smoosh (yes, technical term - don't let it intimidate you; this is easy) it down so the 'petals' fold in a bit. I suppose you could do that as you go too.
Cute!
Then I just tacked them onto some cork that I cut to size a frame I had. I had to use two layers of cork though because the tack was long and looked funny.
I think it would look nice on someone's desk!
And, here's what you've missed:
TTFN,
Tammy


I think it would look great on someone's desk too.....I love those kind of flowers!.Thankyou for the tutorial.
ReplyDeleteNice job on the flowers. I always thought you had to you a die to make a paper flower thanks for info I will have try one/some.
ReplyDelete